
Hard Surface Modelling Overhaul
I mostly do hard surface modeling and heavily rely on a non-destructive workflow so that I can easily change my models. I've noticed a lot of effort in the development of Blender going into making Blender easier to use and more intuitive. A lot of new things are great, but I feel some things are lacking. Especially in regards to hard surface modeling. I've split the post into two sections, Modifiers and Tools.
Modifiers
Edge Groups
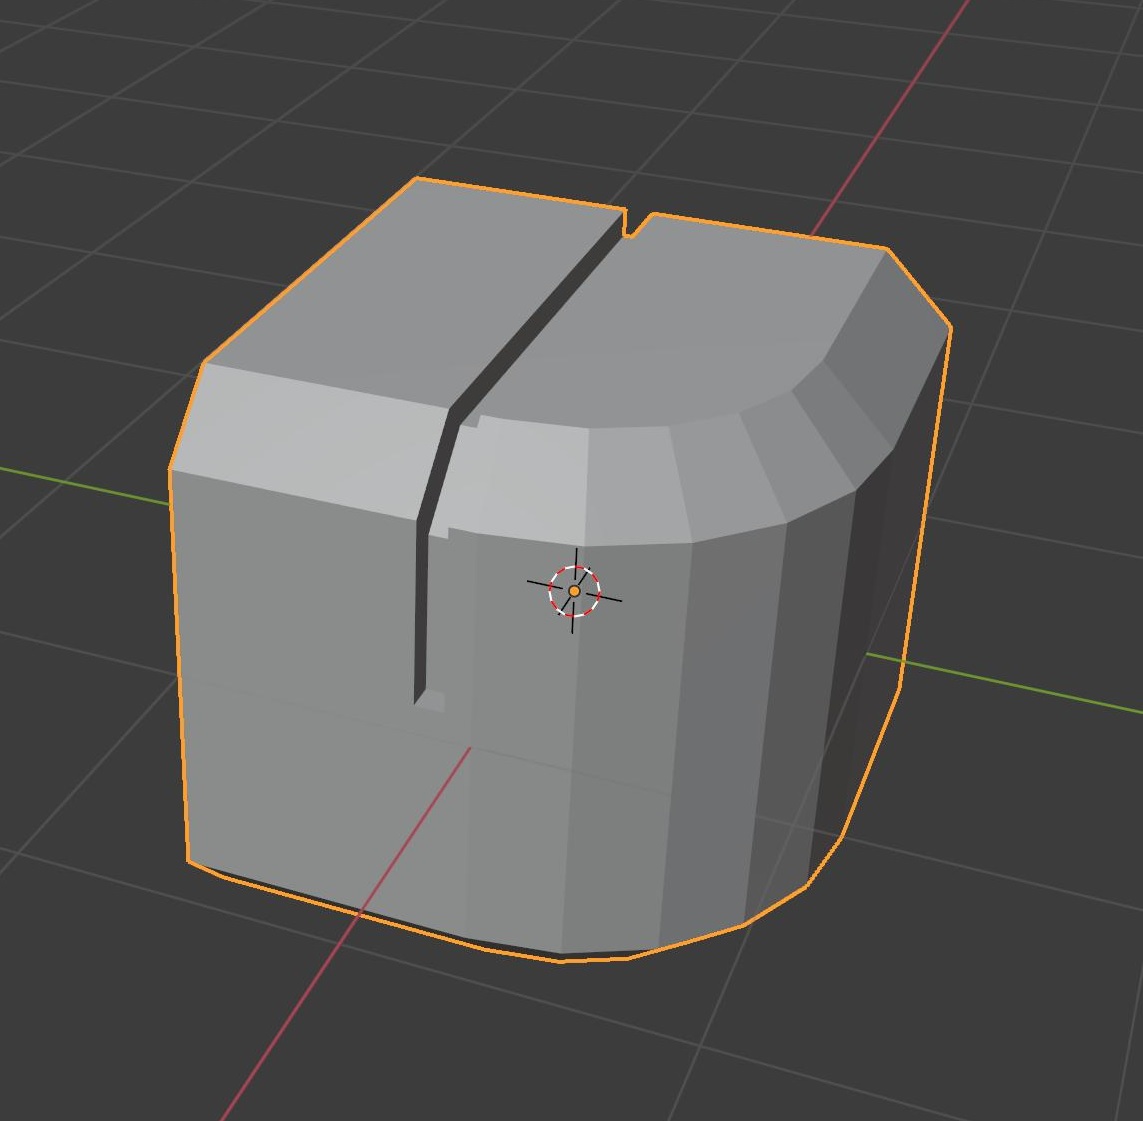
A common issue I have when doing hard surface modeling is using the same modifier (often the Bevel modifier) with different settings. say I want to create the simple shape below.

This can be achieved using the Vertex Groups, thought it's very tedious. I only have 2 Bevel modifiers I want to apply, one with many segments to create the curve and one with a singe segment to create the bevel around the curve. But when using Vertex Weights you need 3 bevel modifiers because you need to make two vertex groups, one for the upper bevel and one for the lower. There's also edges you simply can't select without selecting others when using Vertex groups. An alternative solution would be to simply add Edge Groups.
Groove Modifier
If you've ever worked with hard surface modifiers, especially in a SciFi setting, you've wanted to make grooves. This is obviously possible in Blender, people do it all the time, but it's very tedious and annoying to do. Especially for newcomers. Either you directly edit the mesh itself, which is fairly straight forward but isn't non destructive. Grooves in particular is something that you often want to play around with their exact placement to make things look good. The boolean modifier can help with that, but it's a rather blunt solution and often doesn't give you much control over the shape of the groove without going into edit mode and doing tedious manual editing. With the new boolean solver being significantly slower adding multiple grooves this way very quickly slows down your computer if you try to edit the base object. Simply adding a Groove Modifier which works similar to the Bevel modifier would make this much easier, faster and more intuitive. Suppose you want to make the following groove.

This is done using the boolean modifier, which works pretty well for simple grooves like this, but comes with all the downsides discussed earlier. Suppose instead we could simply make a few cuts in our mesh, and then assign a bevel weight on a different layer (or rather, a modifier weight), as shown in the picture below, and then use a Groove Modifier to cut the grooves. The Groove modifier would have all the options which the Bevel modifier has, changing the depth and width of the groove, the number of segments, the profile and geometry etc.

Cutting the Vertex Group like this apparently kills the bevel, while a bevel weight keeps the bevel as you would expect, see picture below. This is further reason to add Edge Groups, since the Vertex Groups simply can't do what we want them to do in this case.

NOTE, I tried my best to get the Vertex Groups to bevel the edge correctly without success. I might simply be doing it wrong, but I can't figure out what I could be doing wrong in such a simple operation. Either way, you can't specify multiple edges properly with Vertex Groups which results in many issues like this when using the Bevel modifier.
Boolean Modifier
The new exact solver is great, it's something many of us has wanted for a long time. However there's two things I would want it to do to make it better. The first thing is to warn when you're applying a boolean operation between two non-solid objects (or object with strange normals). This would make it clear if it's the solver itself which is doing something wrong or if you are. Alternatively the modifier could (as an option) recalculate the normals before being applied.
Secondly, I would like to be able to edit the base mesh without recalculating every boolean modifier which makes it extremely slow to edit the mesh itself. The way I see it, the modifier simply has to store the faces which it modifies and only be recalculated if any of those faces are changed. This way creating a bunch of holes on the other side of the model won't affect the performance when I edit things not related to those holes. I know I can simply make make the modifier inactive during edit mode to make things run smoother, but then I can't see the final result which makes editing the base mesh difficult.
Tools
Knife Tool
The knife tool is used rather frequently in hard surface modeling and there's basically two things I would like to improve on it. The first one is to be able to snap to perpendicular edges. Quite often I find myself in situations similar to this one:

Where I want to make a cut from one point to an edge where the cut is perpendicular to the edge I'm cutting on. For simple examples such as this one it's easy to just change the view to a top view and constrain the cut with C, but this does not work in the general case when the face you're trying to cut on isn't easily viewable from the front or when the edge you're trying to cut along doesn't line up with an axis. I also do not like this constrain setting since it doesn't feel like it works the same way all other tools work. I feels like it was added as an after thought to make cutting straight easier, but maybe that's just me.
The second issue I have with the knife tool is having to press enter all the time. Granted this is a very minor issue, but it would be so much simpler if I could simply double click to end a cut. This would just make the tool faster and more intuitive to use. In general I think the knife tool needs some reworks compared to the other tools, especially when it comes to it's snapping options.
Rotate
This is another one of those snapping issues, which you're going to notice is a theme among most of the tools. I rather often find myself in a situation where I want to rotate something until it hits an edge, as seen in the picture below.

Here I would simply want a "Snap to intersection" option. This is also one of those rare situations which I don't actually know how to solve at all. If I want a vertex at the intersection between a line and a circle (the rotated line in this example which acts as the radius to a circle) how do I actually do this?
Spin Tool
This tool has a couple of issues which for me makes it pretty much unusable. The tool can't snap to vertices or anything at all except for predetermined angles, which is completely useless when you can specify the angle using a number. If you know the angle, you're not going to be snapping, you're just gonna type in the angle. If you don't know the angle you want to be able to snap to points to define the angle for you. The tool also has the exact same problem as rotate, with the added complication of not being able to rotate along the active element.
The tool has to change in three ways: Enable actual snapping, make it possible to rotate around a selected vertex rather than the 3D cursor and be able to have a different vertex than the rotation origin as the active vertex, since snapping to active would be useless if the active element was always the center of rotation.
Overall this tool feels like it doesn't belong because it works so differently from the other tools. Granted, this tool is rather new and will hopefully change, but I feel like it's important to share potential ways it might work better and see if others agree.
Poly Build Tool
This tool is great, snapping works like the other tools, it's fast and intuitive. The only issue I have is the plane on which the new edges/vertices are snapped to. I would like it to be able to snap to the same plane as the face you are extruding from. In the case of the picture below, that would be the XY plane.

Inset Faces Tool
This tool is rather simple and good, however there's one thing which is off about it. All other tools use CTRL to enable snapping, but this tool uses CTRL to move the inset up or down. This capability is great, but it shouldn't be on CTRL, CTRL should be for snapping, and this tool should also be able to snap. If I want to inset two faces next to each other, as in the picture below, I should be able to simply snap to the vertex/edge of the face I've already inset to achieve the same inset.

When it comes to good UI, consistency is key. This setting breaks that consistency making it unintuitive to what you've learnt from the other tools.
Axis selection
This one is very simple, with the addition of the middle mouse to select an axis the ability change the view as you move or rotate something has been removed. This is very frustrating, so I would suggest that you choose axis by holding ALT + LEFT MOUSE or something like that which doesn't currently do anything. Keep our camera free as we move things.
I also very often find myself wanting to move along an axis that's not X,Y or Z. This new method of selecting an axis using the mouse could be extended so that we can pick any edge clicking on it with ALT+ LEFT MOUSE and use the direction of that edge as an axis. Would be very powerful and also intuitive since it would be the same command to chose X,Y,Z as to chose a custom axis.
I would very much like to hear peoples thoughts on the subject and correct me if there's something wrong in my post regarding how the current tools and modifiers work.
0 Comments