
Curves - Closed splines extrusion to 3D shapes (via modifier)
This proposal is about having a quick way to extrude closed curves into a 3D shape.
PROBLEM
The current way to do it is to extrude the curve (which happens in the middle, we have no way to specify inwards or outwards), then we have to transform it into a mesh, then select the areas we want to fill on both sides (that's the annoying part especially for complex shapes), then clean the triangulations produced by the fill function (selections again)... And that's only for one object! The more curves we need to extrude, the more it gets laborious.
At the moment, the Solidify modifier for Curves is not very useful either.

EXAMPLE
A practical case where this is extremely useful is for architects; when receiving a plan, the ability to extrude all walls at once is a real time saver:

PROPOSAL
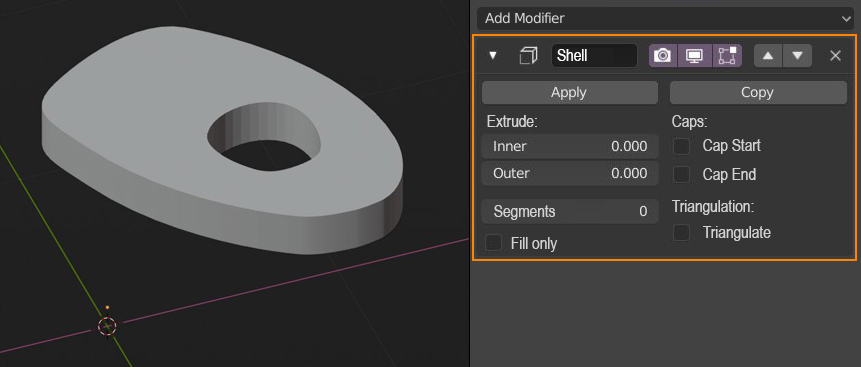
I propose to make a modifier for curves that exclusively focuses on extruding all closed curves with a few controls. Either we adapt the Solidfy modifier or we create a new one we can call Shell, for example. Here is what it would do:
- Extrude: specifies the amount to extrude on inner or outer side of the curve (it doesn't start in the middle like in the first example above).
- Segments: number of loop cuts on the sides of the extrusion
- Fill only: When checked, that option only fills the closed curves into a 2D shape without any extrusion (and greys out the Inner and Outer amounts, and the Segments).
- Caps: fills the "holes" that appear from the extrusion. There should be a detection if there are splines contained inside other closed splines (like in my example with a hole in the middle)
- Triangulation: when checked, connects the verts to triangulate the caped sides (or the fill only), when left unchecked, leaves the fill as a surface without edges connecting the dots.
Some rules:
- Obviously, all verts have to be coplanar for this to work correctly. A warning message could eventually be displayed if that's not the case.
- If it finds no closed splines in the Curve object, it also displays a warning. If it finds a least one closed spline, it performs on it and disregards all other opened splines.
- If the modifier is applied, it turns the Curve object into a Mesh Object (if there were opened splines, they don't exist any more and don't leave random unconnected verts).
11 Comments
* @IIIFGIII * What's wrong with how it works now? You should do some research. This functionality is in Blender for more than 15 years.
And of course, you can triangulate just n-gons. The triangulate modifier lets you specify, how many sides the face has to have.
{attachment Curvesmp4}
* @WiresoulStudio * You know what - thank you !!!! :) It's all about the fact that I'm just so f* idiot. I never switch from 3D spline to 2D so always thought they both work same way. Just never have any real case to work with splines enough to research how it work in Blender.... omagad. I work with Blender around 2 years. Shame on me :) I feel so shamed.
* @IIIFGIII * Go easy on yourself. My 3D modeling experience started around 20 years ago. (Mostly NURBS based.) Initially when getting into blender back around the 2.77-2.78 release, I also found the 'Modifiers' to very un-intuitive. Though as I have done more research, they have proven to be much more capable and powerful than I would have ever initially thought.
The results you are looking for can already be achieved but using either the Solidify or screw modifier, followed by the Triangulate modifier. Granted if using the Solidify Modifier; you are required to convert the curve to a mesh object. It would be nice to have an option to have a linked mesh copy; which the Modifiers could use to generate results from.
The Screw Modifier allows you to use curves directly, though it does not have any options for filling with an end cap.
The triangulate modifier does already work in most cases; although it would be best in my assessment to have an option that ONLY changes NGON's; and leaves quads alone.
I would appreciate such features; though it's likely that many will see this as a request based on unfamiliarity with the existing tools/modifiers. Though some minor tweaks could greatly enhance the available tools/workflow for hard surface modeling.
**Also note that there are different options in the 'Object' panel when using the 2D vs 3D options. 2D allows for the end caps, 3D does not; at least not in the way you are expecting.
* @matthew1 * Edit: i'm just so idiot :) I have to learn Blender better. Btw. here what proposed alternative GIF.
* @matthew1 * I didn't know the Screw modifier could be used like this, so I just tested it. Although it's a clever workaround, there are some limitations: caping like you said, but also the steps can't go lower than 2, meaning there will always have at least 1 loop cut.
To use Solidify on a mesh object would still require to fill the closed splines first, which is tedious work depending if you have holes inside the extrusion you want to perform. Also Blender doesn't let us select the boundary edges for a proper fill (well unless we use the Select Non Manifold Boundaries workaround).
The Triangulate modifier performs on all faces and therefore not a good solution neither.
The Object panel does allow to Fill Caps but that's for caping the ends of non closed beveled spline, not the caps of a closed extruded shape. Unless you're talking about something else...
And lastly I'd like to say it's not unfamiliarity with the tools. I'm testing things a lot before posting proposals. I know what can be done in Blender, it's just the incredible amount of steps it takes that gets frustrating. I'm just trying to improve the workflow for faster results.
* @Ryxx *
Try this: Insert a curve. (I tried both Bezier and Nurbs circle; and they both worked. )
Click the '2D' panel @ the top. (In the 'Curve' properties tab.)
Tick the drop-down where it says 'Geometry' Click and drag, or enter a specific value in the 'Extrude' entry box. now go back up to the top where it says 'Fill Mode' Try the options "Back, Front, Both, None.'
This creates end caps as I believe you are looking for; though it doesn't specifically address the triangulation issue mentioned. at least not without doing more manual work, aside form the Triangulate Modifier. (which as you mentioned applies to ALL geometry in the stack.)
Don't get me wrong, I gave you an up-vote and hope to see improvements in these areas. As is, I would agree that the Modifier workflow still leaves much to be desired for hard surface modeling. Though there is much more power in even the existing tools, than is obvious at first glance.
**Also keep in mind the power of the new 'Weld' modifier. It can really make boolean operations generate much more predictable results.
* @IIIFGIII * No need to get so defensive. I did not provide a step by step solution; I simply indicated there are other modifiers/workflows, which in combination, generate some of the things being asked for. I would advice you watch the newest updated videos about Hard Surface Modeling in Blender, that Gleb Alexanderov has recently released here:
youtu.be/16f4RwxP9n0
All of them are quite in-depth and address specific hard surface workflow issues that result in proper geometry.
These are the videos released so far; which address 'most' of what you are saying does not work:
Boolean Modifier 2.8x: youtu.be/KTWo-iEvEB8 Bevel 2.8x: youtu.be/C3n3DFxYm_Y Mirror Modifier 2.8x: youtu.be/DekBcSb0HFE Weld Modifier in Blender 2.8: youtu.be/UFZ5yRrqvtE
There will still be more to come, and I would advise to keep an eye out for updated video content for the Array and Screw modifiers. Both are capable of much more than what you think they would typically be used for. (And you can likely find other youtube sources that will help you with these.)
It seems better to point you to these great resources, since these videos are far batter than me trying to explain it here.
And as I also replied to the originator of this post; I gave him an up-vote, and do think there is room for improvement in the hard surface modifier workflow.
* @matthew1 * Thanks for the tip. Indeed it does get pretty close to my proposal. Just the triangulation thing that still gives messy results.
So I tried caping by selecting the boundary edges and filling it in mesh mode, and it's working well. But if the shape has a hole in it, the filling is messy (overlapping faces, Z fighting...).
Nonetheless, a modifier still seems like a good solution to me to achieve that.
* @Ryxx * The new 'Weld' Modifier is likely the solution you are looking for. (2.82+ only) **Also take look at the response I replied to the other person's comment, It includes some great video resources for this workflow.
(Sorry, I am not sure how to flag the other comment on here. )
Here is the first video in the series; but you want to want the subsequent videos as well: youtu.be/16f4RwxP9n0
Try solidify modifier works like shell