
Locking the sculpt plane without locking sculpting to the plane (TrimSmoothBorder in zbrush)
Being an environment artist, TrimSmoothBorder brush in zbrush has got to be my favorite brush. Blender can nearly replicate the brush, but not quite. There's a 1 fundamental option missing.
For those who don't know, trim smooth border works like this . It forces polies under your brush stroke down to a plane that is defined by the plane of the surface where the stroke first started. It's super useful for sculpting damage on stuff like rocks, bricks, wood, concrete, you name it and it can give some natural and awesome looking results. (plus square alpha makes it look even cooler)
In blender, there's the scrape brush. It works just like TrimDynamic brush in Zbrush. The difference with TrimDynamic is that the plane rotates along your brush stroke. Both of these can be useful for different purposes, TrimDynamic gives a softer look.
In blender, there are options for changing the sculpt plane (X, Y, Z, View plane, Area plane) as well as a button that says "When locked keep using normal of surface where stroke was initiated". However, it locks the stroke position too so you can't go over the initial plane.
Here I show how these all behave . I'm using a square alpha here and as you can see, when I'm using View Plane as the sculpting plane, it works just like TrimSmoothBorder would, but I have to view it from above. There's no way to pick up the initial surface plane while not locking the stroke to it.
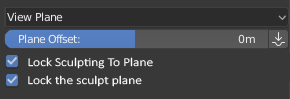
My suggestion would be to have 2 buttons as well as the sculpt plane dropdown.
- Lock sculpting to plane (would replace the old lock)
- Lock the sculpt plane (proposal)
1 downside to this design for the options is that Lock the sculpt plane would only have an effect when the sculpt plane is set to Area Plane, because none of the other options can change during the brush stroke (X,Y,Z,View plane), but I think it's still the best alternative.
2 Comments
I really like this proposal. But It's a bit confusing with the current naming. Easier to understand I guess would be to call them "Lock Normal Position" & "Lock Normal Orientation"? Or "Lock Plane Position" & "Lock Plane Orientation". The tooltips need to do some of the explaining anyway but this way both options don't sound exactly the same ;)
Overall I think this extra option makes sense for Area Plane since it splits the behaviour of the lock icon to two options. For view plane it would only show one of them of course since the normal orientation is basically already locked.
@julien.kaspar: "Lock plane position" and "lock plane orientation" would work the best I think. Plane because it's more abstract than the word normal and normal wouldn't make sense in this context