
Armature Modifier - Extra 'Preserve Volume' Vertex Group
So, the armature modifier has a 'preserve volume' option. That is particularly helpful in some places of a rigged character like wrists or shoulders. They deform much more realistic. Very Neat!
But in other places, it does the opposite and creates bad deformation. Not so Neat.
Right now there is a workflow to use two stacked armature modifiers, one enabled with 'preserve volume', one without. You then define a vertex group for the 'non-preserve volume' modifier for the areas that should not be affected and add vertices via weight painting. Then you tick the 'Multi Modifier' checkbox.
It works. But why do we need this odd 2 armature modifier setup?
My proposal is to integrate a second vertex group option, just for the 'preserve volume' setting in the armature modifier.
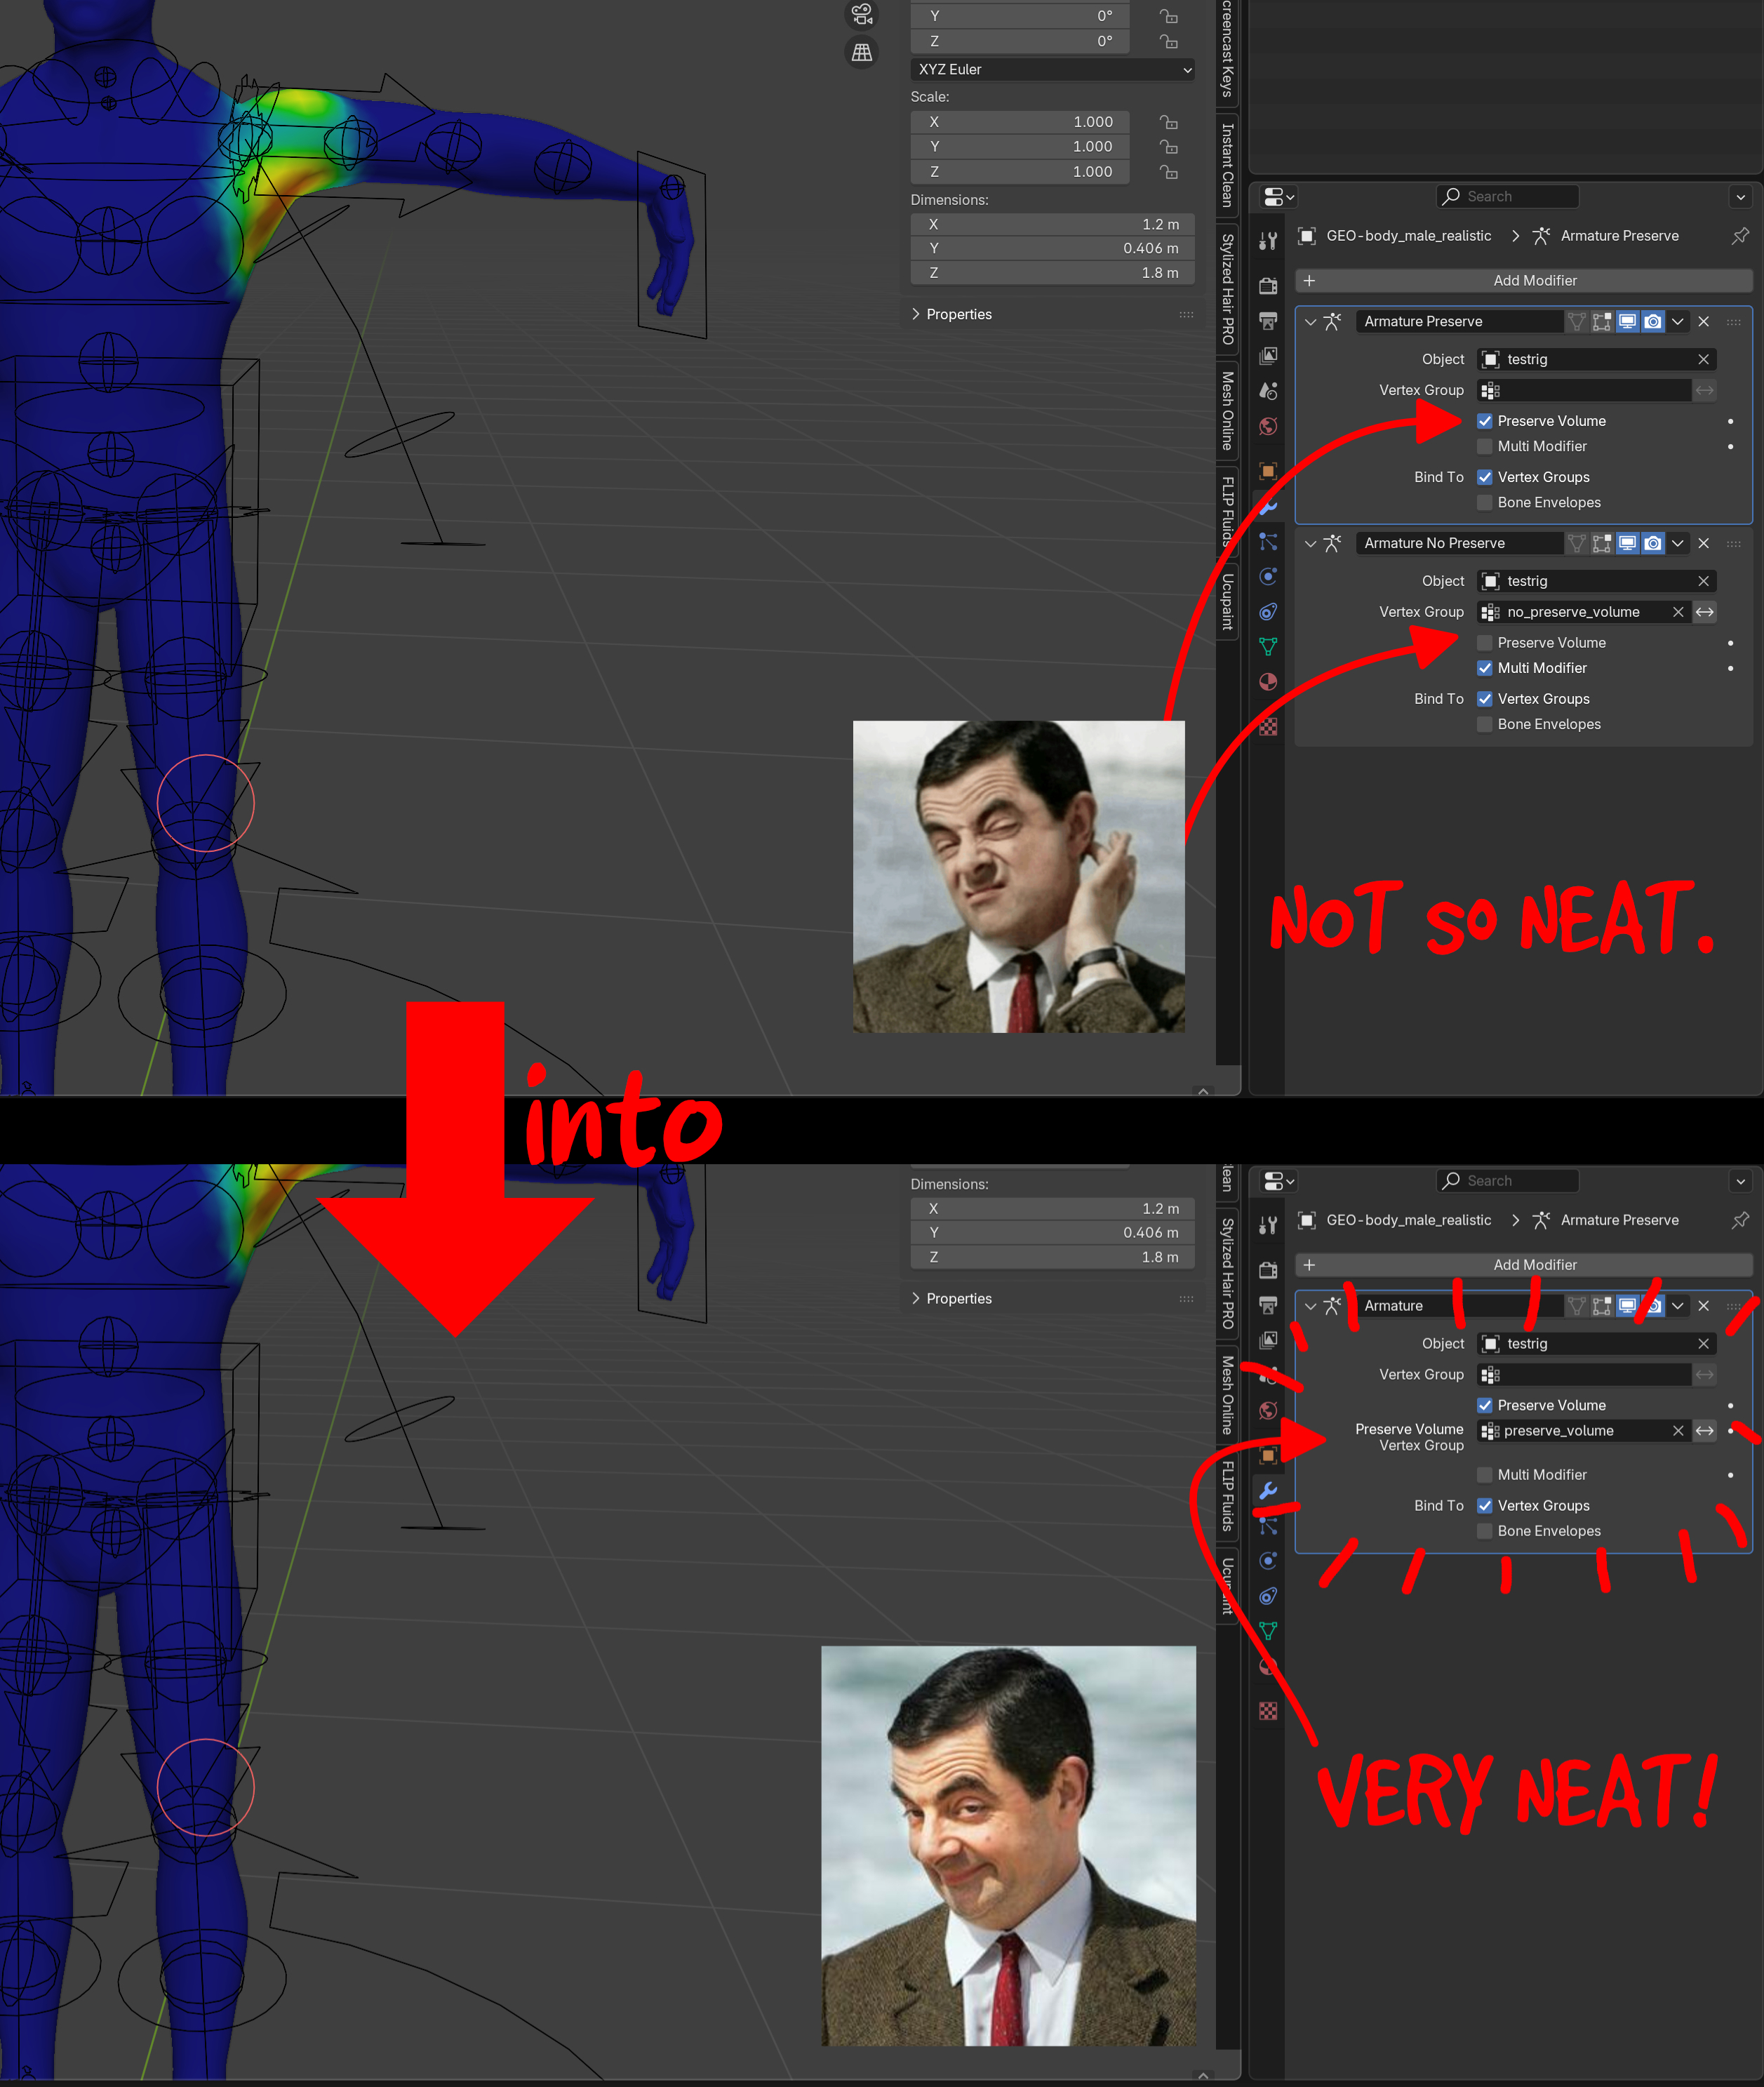
This combines the 2 modifier stack and makes it more intuitive. A small quality-of-life improvement . And while we're at it, maybe add a strength slider as well? Couldn't hurt, right?
These things have been proposed before, 3 to 5 years ago.
blender.community/c/rightclickselect/Q6NL/
blender.community/c/rightclickselect/ydhbbc/
To my amateur eyes, looking at coding these changes to armatures, it can't be too difficult, right?
Anyway, happy blending.
1 Comment
Hi; it does look like an important UI improvement at first glance --and maybe it is after all. But I can't tell currently, because I don't really understand fully how that Target Vertex Group is supposed to work in various different Setups.
More people keen within the bigger picture, should look at that (I cannot Vote for the time being, sorry).
But for me, this Multi Modifier Option, does not to a nice feature --I've even Bug-Reported these days: it causes conflict with a starting, Enabled Mirror Modifier in the Object Modifiers' stack: projects.blender.org/blender/blender/issues/154923
The Setup variation I'm currently using nowadays, is the one from Mr. Gibbs: youtube.com/watch
"But why do we need this odd 2 armature modifier setup?"
That's indeed a good question. Should the Armature Modifier be developed more thoroughly, I believe it might probably be able to solve 'Multi-Skinning-methods/algorithms' in a single round of Armature Modifier [i.e., a single Armature Modifier would be already able to self-distribute the the Target Vertex Group(s) from different Options of Skinning methods/algorithms.
Currently in Blender, the Enable Preserve Volume Option brings up the alternative Dual Quaternion Skinning method/algorithm (DQS method); but with it by default Disabled, what we get is the industry standard Linear Blend Skinning method/algorithm (LBS method). So, we can make a gradual Mix/Blend between them with a Target Vertex Group and a proper technique of Double Armature Modifiers.
But, to be fair, both those Skinning methods/algorithms are not very nice when it comes to naturalistic Deforms; they have critical drawbacks.
Furthermore, your idea of adding some sort of "Influence" Slider Button, although a bit redundant because Weight Paint was originally supposed to generate that variation of "Strength" or "Influence", the fact is that if that Slider Button existed, it would be more efficient (because of 'Weight PAIN'), and could staaart providing some hope in Blender's Organic Rigging handy possibilities.
But, maybe someone should make a Feature Request just for that Slider Button, and/or re-design even how to make it better for those mixing tricks.
As for me, related to that, what I think would really change everything if possible, would be to have a 3D Character Mesh Object possessing not just 1, but MULTIPLE Rest Positions (i.e., Binding Pose States, Mesh Object on Edit Mode); maybe, that could be achieved if each single Added Armature Modifier, provided the possibility for its own specific Rest Position of the 3D Character Mesh Object. The reason for that, is that, the Skinning method(s), even if it's 2 of the same kind, such as default LBS method, they would 'Meta-Interpolate' themselves from 2 different Rest Positions (e.g., T-Pose and A-Pose, T-Pose and X-Pose, etc.), thus calculating the final Deformation's results would spontaneously occur much better than if just having a single, unique Rest Position to serve as a reference for the Skinning algorithm calculations. This, can be seen as an analogy to the 'Strength' or 'Influence' Slider Button feature that you have mentioned before, but it tries to do this Blending on 2 (maybe more?) Rest Positions, not necessarily on Armature Modifiers (although it could also be the case). Of course, this is highly conjectural. If someone doesn't grasp the context of that investigation, it is because, the Rest Positition of the Mesh of the Fingers of a Hand, matters for the calculations of the Skinning method (indifferently of the Deform Bones): if the Phalanxes are set Straight or Slightly Bended (e.g., +/-30° Rotation on their X Axis), that will cause different results; usually, the second case provides, spontaneously, better Deformation for the Fingers --but at a terrible cost: Modelling Straight Fingers is much easier than Bended Fingers; it is very complicated and annoying to Change Rest Positions of Rigged Models in Blender; what Rest Position is good for Skinning might not be good at all for Model Sheet references, nor for Mechanism & Control Rigs and such, which tend to benefit from orthogonal Bone Orientations to World Space.