
"Scale to render size" checkbox in Image and Movie Clip nodes
When compositing -specially when you are dealing with 4K footage- you might need to scale down the footage in order to work faster.
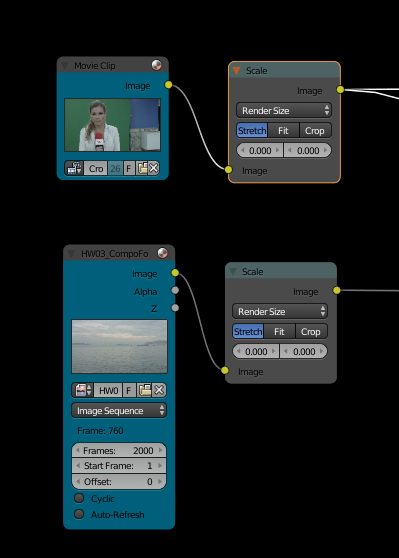
The way to do that is adding a Scale node after your footage set to Render Size as you can see in the attached image. This way, if you change your output resolution to 50% or 25%, the compositor is going to operate with the down-scaled footage. This means, faster.
As this is a very common workflow and there's an increase of 4K projects, I think that adding a checkbox to both Image and Movie Clip nodes for scaling to render size would be a great benefit to the users.
7 Comments
Someone with more familiarity might have to comment on this, but to my knowledge, the output from most nodes (like the Scale node) is not cached, so using it as a general speed-up is not that effective currently. If you edit downstream in your node tree, Blender still has to process the scale node.
Or are you using this to speed up just the downstream nodes because they're not dealing with the full resolution image (even though there's the sunk cost of rescaling)?
Yes to the second one. The clearer example is the blur node, blurring is one of toughest things for rendering. Blurring a 1080 image is faster than blurring a 4K one even though re-scaling process.
Of course, the problem there is that the blur node values are pixel-sized... so you'll need to change your blur values when your image is properly scaled for final output.
Yes, but that's the reason for using Relative blurring instead of regular by-pixel blurring. As I said this is a common workflow: you put the Scale nodes and always use relative blurring.
Wait... I think I misread something in your proposal. You're asking to take something that is an explicit operation (adding a scale node) that is easy to disable/mute and make that an automatic checkbox in the actual input node itself?
If that the suggestion, then I'm not a big fan of the idea at all. How is this an improvement over adding a Scale node and muting that node when you go to final render?
Because you don't need to mute that node ever. You just need to render at 100% and the node is not going to make any scale change. With this workflow, that I learnt in Sebastian Koenig's Track Match Blend, you always have the node active. You just change the final output resolution.
And for the sake of clarity: This workflow tries to emulate other software's feature that allows you to just scale down your composition for quicker previews and test renders. Adobe's After Effects have it on its viewport's bottom.
Imagine that you are making a 4K postproduction compositing that means that you have all the passes rendered as Image Sequences. You have to add a Scale node set at Render Size after every Image Sequence node, meaning that you'll have to do that 4-8 times depending on the project.
In addition, this might be active by default in my opinion. If you render at 50%, you are expecting to have a 50% resolution image, not a centered crop of your output. The last is what you'll going to have if you render without the Scale node setup.