Setting your blender camera like a pro
[ Here's an article I wrote for applying for a job that I didn't publish, so I thought on publishing it here. The "I'll write a nice article" option gave me the idea ]
Are you one of those people who would fiddles for hours with camera settings until you get more or less what you were looking for? Or worse, just move the camera until you frame your character? Well, there’s a lot more to have in mind if you want to take advantage of your camera settings.Here’s a simple guide on the basic settings. We’ll see how changing the camera settings but maintaining the shot (like a close-up, a medium shot or a long shot) can make huge differences. Anyways, all you should know it’s that:<strong>It’s all about perspective!</strong> <h2>Focal length, or why zooming is not just zooming</h2> Changing the focal length also changes perspective. What does that mean? Wider angle lenses (usually around 18 mm) tend to accentuate sizes and distances, making a character features more prominent and showing a bigger part of the background. At the same time, longer lenses (around 100 mm) “compress” space, moderating the apparent size of face features and showing a smaller part of the background. Look how different Koro from Caminandeslooks. If you’re aiming for a more funny look, the wide angles are the answer. If aiming for serious, long angles should do the trick.
 Wider angles (smaller number) accentuates face features<h2>Sensor size, or why size sometimes matters</h2>
 Did you ever heard about 35 mm cameras, super 8, or “hey, better buy a Canon 5D, it’s a full frame camera y’know?” Well, they all refer to the size area of the sensor in digital world, or film in the (maybe soon to disappear?) analogic world. If we are trying to emulate real photography or cinema, which is quite common in CG, we should choose a specific sensor size for our needs.
 You see, same shot but different perspectives (I moved the camera each time for maintaining the size of Koro on the frame). Have in mind that if you use smaller sensor sizes, like super 35 or super 16, it has the effect of “zooming”, so you’ll need to move the camera away from your subject, and if you don’t plan this ahead you may have problems later on with your environment, like modeling a room that it’s too small for your camera needs. No surprise that a cinema rule of thumbs is to film in rooms twice the size they are supposed to represent.For the cinematic look I changed the image aspect ratio, meaning the shape of the frame (making it wider), which in cinema is usually 2.39:1, wider than the 16:9 of normal 1080p. Want to try it too? The resolution is 1920 by 800 (instead of 1080). Oh, by the way, by doing that you’re not only imitating the image aspect ratio of cinema, but you are also saving render time since the size of the image is 3/4 of the normal 1920 by 1080 pixels image!<h2>DoF and F-stop, or why you should “focus”</h2>
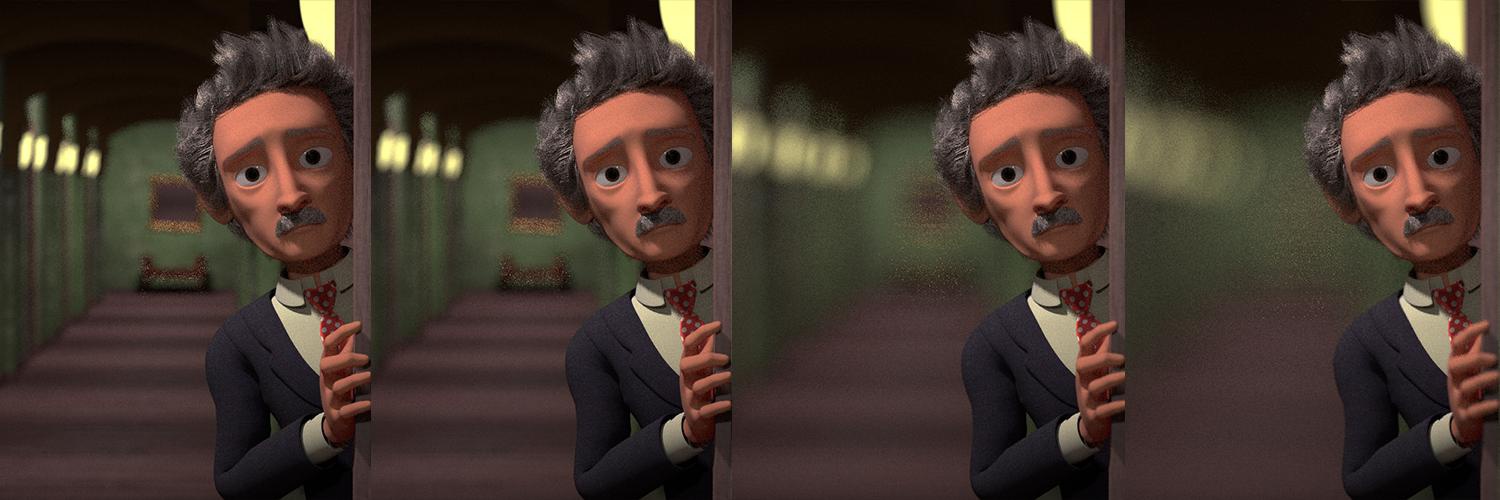
 The Depth of field, or DoF, is the distance between the closest and the furthest points that appear in focus. The important thing is to know how it varies and when to use it. In Blender you have 2 options, to apply it in the compositing stage (faster but less accurate) or at the render stage through the camera settings (a lot slower, but better). Since we are looking at the camera settings, we’ll go for the second option.To activate it we have to set a Radius or an F-stop number in the Depth of Field section. For me F-stop makes more sense since it’s how it works in real life photography. Don’t be scared by the weird numbers, it’s really easy.<strong>The bigger the F-stop number, the sharper the image</strong>You can use Depth of field for isolating you characters and guiding this way the attention of the viewer. But don’t overkill it! It’s always desirable to have some details in the background.
 Oh, and <strong>don’t forget to choose a focus distance or a focus object!</strong> I recommend you use and empty as your focus object and parent it to the camera. If you are rendering a character, the rule is that <strong>eyes should always be in focus</strong>.Do have in mind that there are other variables that affect the depth of field, although the magic of CG is that you don’t have to pay tons of money to have any F-stop you want, so you can have any DoF just by setting the F-stop you need. Here’s a handy table for knowing how other variables affect the DoF:
 <h2>Surprise, surprise: Shifting!</h2>
 Sometimes even “pros” don’t know about shifting
 Canon Tilt-shift lens. It cost only 2 grand… Shifting is something that even your amateur photographer friend may not know. In real life “Tilt-shift” lenses are rare and expensive, but in Blender world you can have it for free!This feature gives you an amazing control over perspective. Say what?! Let’s say you frame Koro all fine and dandy, but then you realize you want him to be in a different part of the frame, like move it so that it’s not in the middle but a bit to the left (for compositional reasons, like the rule of thirds). What you can do is either move the camera or rotate it… but wait! If you do that, you’ll be changing the perspective too (the background will change). But now you know what to do, shift it so that you get the composition you want without changing perspective.
 Moving the camera instead of shifting it changes the backgroundThis kind of lenses are very often used in architectural photography, allowing you to take pictures of big buildings without deforming them too much (you see, it’s all about perspective). Take this example, both with the camera at the same location, but one rotated and another with the X rotation at 90 ° and shifted up in the Y axis so that it can still take the entire building from the same location.
 Shifting helps you preserve the perspective, like straight lines for exampleThat’s all for now folks! Go and fiddle with your camera settings, but this time knowing what you’re doing.Cheers! Credits:– Caminades shots (which I modified): CC-BY Blender Foundation – www.caminandes.org– The Cookie FlexRig CC-BY by CGCookie, created by Nathan Vegdahl, Beorn Leonard and Jonathan Williamson.– “The building” by miklosizoltan, downloaded from Blendswap.- "1D BAROQUE MMXIV collection" by 1DInc, downloaded from Blendswap.