
Improvemets to the Outliner hierarchy, and parenting one object to another object
Hello, people of Blender! I'm still relatively new to the Blender scene, but I've been able to pick it up pretty quick thanks to customizing the controls to resemble that of Source Filmmaker. I've actually learned quite a lot on my journey of understanding the Blender counterparts of things in SFM, however, although Blender is 99% better than sfm, there are just 2 little things that the 2012 abandonware does better than Blender that I think Blender could some improvements on.
- Let's start with the bone hierarchy.
TLDR version: Better bone hierarchy for selecting and finding bones in the outliner.
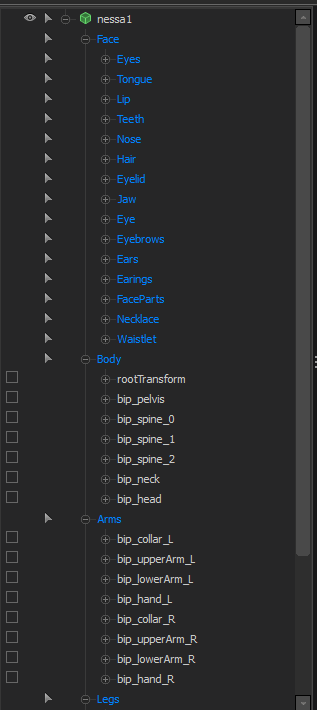
This is the bone structure in Source Filmmaker. As you can see, everything is neatly organized. The "Body" group houses things that go to the main body, such as the pelvis, spines, head, and neck, the "Arms" bone group has bones such as the collar, upper arm, lower arm, and hand bones; bones that go with the arms, and the "Legs" group obviously does the same thing for bones that go to the legs. There are also subgroups, such as those in the "Face" bonegroup.
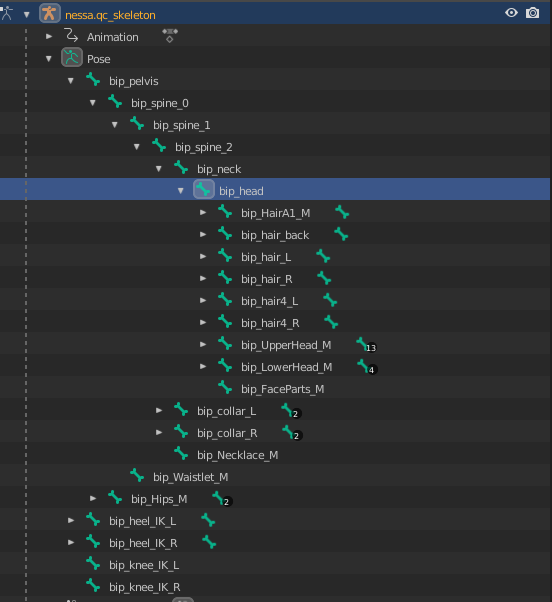
The structure in Blender, however, is not good. Say I want to click on the bip_head bone. I first have to drill into bip_pelvis, then bip_spine_0, then bip_spine_1, then bip_spine_2, then bip_neck, and then I finally arrive at bip_head.
If I parent the pelvis to the hand_ik bone, that's another bone I have to go down just to get to bip_head.
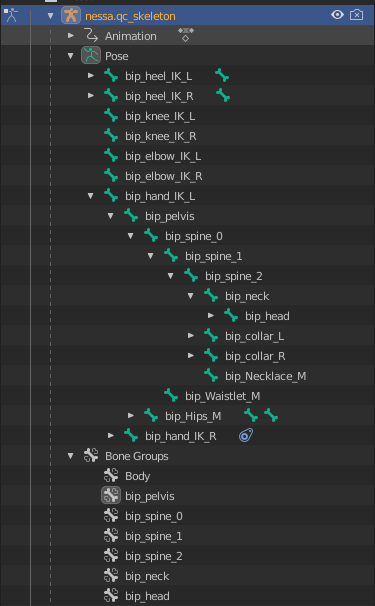
As you can see, I tried to simulate SFM's setting by using the bonegroup option in the Object Data properties panel, but selecting from the bonegroups doesn't work from the Outliner.
I know I can just select the bones in the viewport, and you can do that in SFM as well, but I'm just not a fan of selecting bones in the viewport when animating.
- Now that that's out of the way, time to talk about the Armature constraint.
In Source Filmmaker, we call this way of parenting "Locks"
Locking a bone to another bone on the same model, OR a different model is very easy, you just drag and drop it onto the target.
Locking a bone to another bone on the same object is fairly straight forward in Blender; You just click the target bone, then shift-click the bones you want to parent to, then press CTRL P, and click Bone Relative (Or Keep Offset if you're in Edit Mode)
Locking one object to another object, or a bone on one seleton to a bone on another skeleton, however, is needlessly complicated in Blender.
In Blender, however........
-
Click on the armature or object, in object mode. If the object is an armature, go into Pose Mode.
-
Click on either the Object Constraints tab, or the Bone Constraints tab. They both share most of the same constraints.
-
Click on the Armature modifier under the Relationship category.
-
Click on the Add Target bone option, then select the bone or object you want to parent to. If wanting to lock to an armature, select the desired bone.
-
After you've got the parenting set up, go back into Object Mode...
-
Select the object or armature you just defined as the target, then go BACK into Pose Mode.
FINALLY, move the target or target bone, and it will move the original object where you activated the armature constraint in the first place.
Again, to lock something to something else in Source Filmmaker, all you have to do is click on the object, and drag it onto the other object.
I would really love to see these two improvements in Blender the most going forward, as these are the only two things that Source Filmmaker does better than Blender.
I've also linked the official tutorial for locks in SFM if anyone wants a video explanation.
Not sure if I can post multiple ideas in one post., if someone could let me know if I should break these ideas into separate posts, let me know, and I'll edit accordingly.
5 Comments
Hi
I think that this is reason to use collection to reach effect with you show, but probably you omit this and expect find the hierarhy on natural tree of relations.
blender.community/c/rightclickselect/f1hbbc/ Outliner icons sorted to right side? blender.community/c/rightclickselect/WPqg/ Armature inheritance as Independent solution and Instance
Hi, welcome to RCS !
Just to let you know, posts here are expected to contain only one feature proposal at a time. Because we are supposed to vote them and discuss them. Here the votes mean nothing as they might refer to any of the topics you brought here. And browsing through the posts list makes your proposal foggy. And discussion becomes hard as we have a lot more to discuss and constantly need to indicate what we actually write about, making each post and reply significantly bigger and messier.
1. Bone hierarchy
Well, correct me if I am wrong but SFM doesn't really show the hierarchy per se. It looks like the names in blue are more like Blender's Collections, groupements that allows to break the actual hierarchy (childrend ↔ parents relationships) displpay to make it more human-friendly. But considering Blender does have collections, that is up to the rigger, not the software. Nothing prevents you from sorting your rig that way AFAIK.
Now if the collection system is not enough to get that, maybe you need to elaborate more on what could be done in Blender to make this possible. Maybe a new "manual" sorting mode in the outliner with a specific grouping system.
2. Bone constraints
That's the long manual way to do constraints. You can also just select your target bone, then the bone you want to add the constraint, hit Ctrl Shift C and choose the constraint. The targets will be automatically set up from the first bone you selected.
I know there are some stuff like that where Blender could allow doing things faster and/or with a more visual interaction, but replicating things that softwares like SFM do is hard: SFM focuses on animation only, so he only cares about the constraints he has with the animation process. Blender is not in this sweet spot at all, the has to care about basically everything a 3DCC software can do. I.E. That's why you have a strict hierarchy unlike in SFM, because of how rigging works.
Ah. Should I edit this post, then make another post for the constraints? Most of SFM's workflow is already capable of being done in Blender in some way or another
Blender can already do everything else as easy as sfm, including controlling lights the same way you would a camera, which I didn't find out until recently.
I can even see how it would work, where it's basically BoneGroups for the outliner.
Say for example, you expand the "body" collection, and you have all your body bones. You then click on bip_spine_2 because you want to animate or move that bone. Once you've clicked on the bone, it is highlighted in blue, while bip_neck from the body collection, and both bip_collar_R and bip_collar_L in the Arms collection are highlighted in green, as if you searched for them using the search field. This would be an indicator that said bones are children of bip_spine_2.
bip_lowerArm_L and bip_lowerArm_R wouldn't be highlighted, because they are children of bip_upperArm_L and bip_lowerArm_R respectively.
This way, you have the best of both worlds; outliner organization that is easy to navigate, and you'll still know what is parented to what. based on the highlights.
The thing is, the outliner is currently designed, as any other similar software, to dhow the objects hierarchy as is. What you are asking for is basically an arbitrary display that the user can edit independently to the hierarchy. Thqt's not impossible to do, but we have to figure out how to implement this into Blender in terms of UI. And answer to the issues it may cause, one of them being : how to not confuse the user.